Add Contact Managers
The Contact Manager (CM) is an advanced storage for your contacts allowing you to create multiple contact records and distribution lists, and then use these lists for different distribution campaigns. It can be used for the following purposes:
To manage and launch forms to regular participants from the CM;
To set up users for the Participants Portal;
To allow the CM to be part of an Object Lookup question within a form.
How to create a Contact Manager
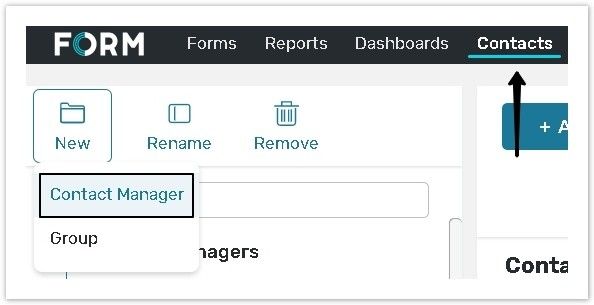
Go to the Contacts menu and click the New button.
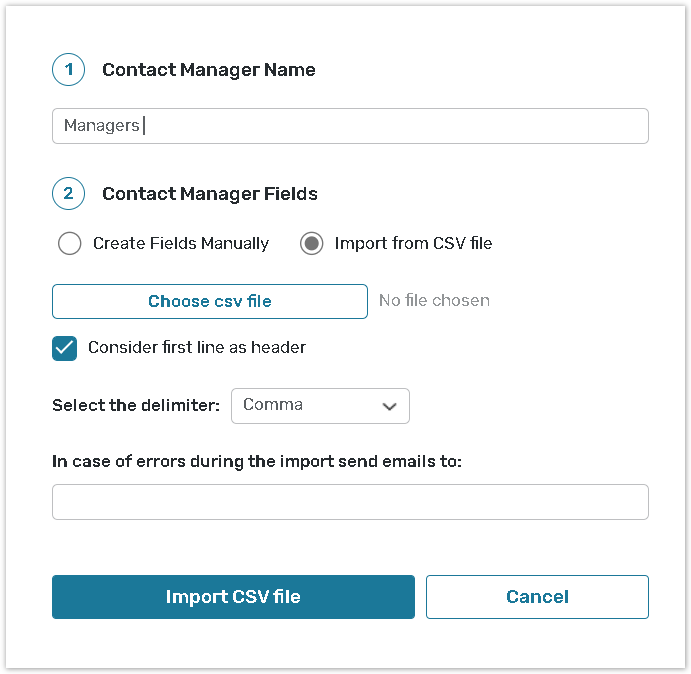
Specify a Contact Manager’s Name and select one of the CM creation methods.
.png?inst-v=5c056e1e-ae23-46ea-99ee-f3d1279e23b0)
Create contact list by manually editing fields
Using this option you can create new contacts by inputting all required information manually. It is commonly used, if you do not have data saved in an external data file or to update the existing contacts list with new contacts quickly.
Decide what information your Contact Manager should contain and add the Contact Manager fields. These fields will define the structure of your CM and will form the column headers of the data table. The following five fields are created automatically: Name, ID, Email, Login, and Password.
Enter a label for the new field under the Field Name column;
Select the appropriate field Format according to the data type that will be stored within this field;
Click Add new column to add one more field if necessary;
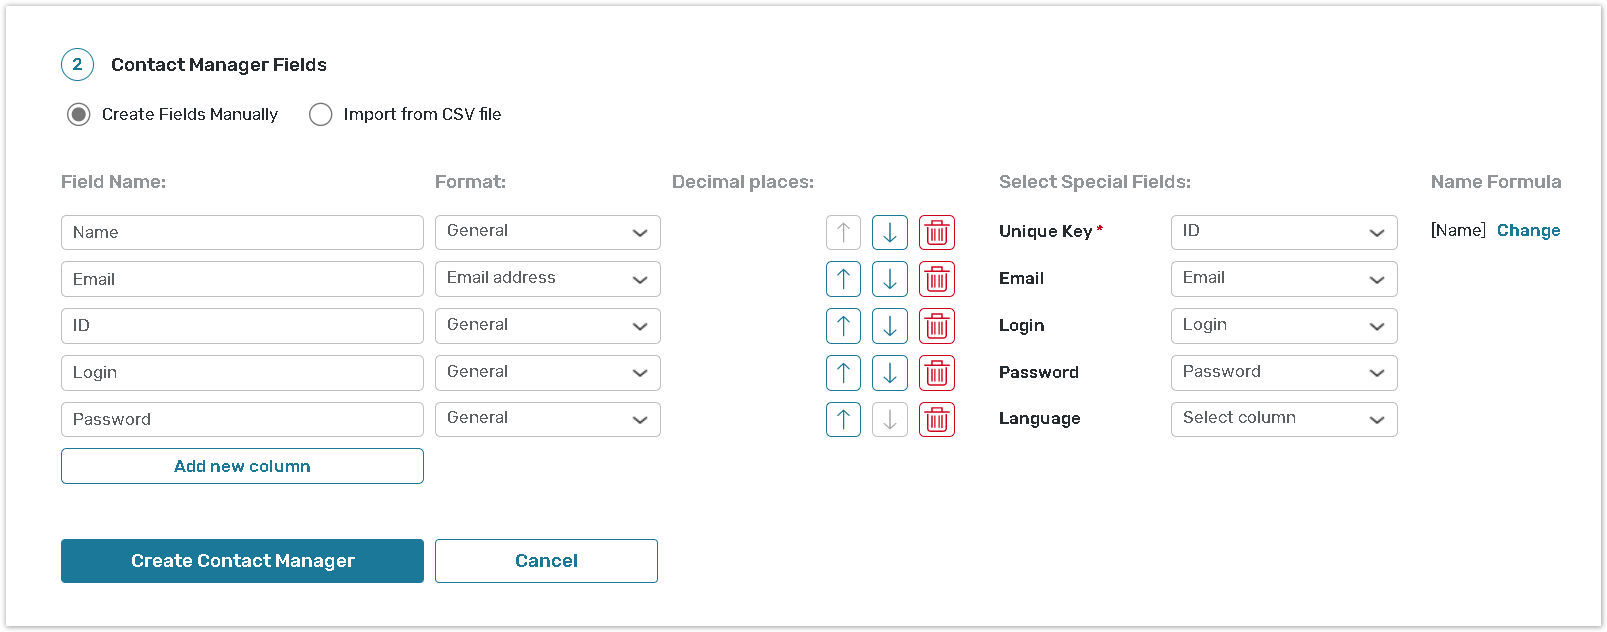
When all the fields are added, under the Select Special Fields, indicate the fields that will be used as a Unique Key, Email, Login, Password, and Language.
.png?inst-v=5c056e1e-ae23-46ea-99ee-f3d1279e23b0)
- The Unique Key will be used as a unique contact identifier.
-The Email will be used for email distribution purposes.
-Login and Password fields will be needed to provide access to the User Portal.
-The Language column stores a portal/mobile application language preference for certain respondent.
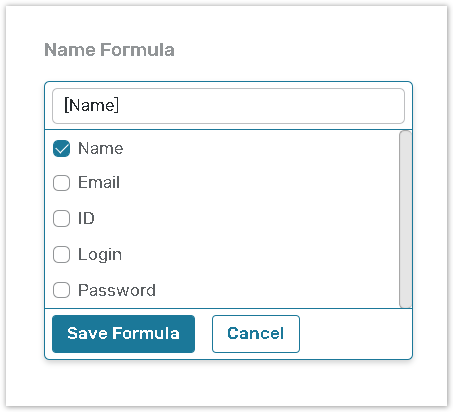
Next to the Name Formula field, click on the Change button to select the contact’s name format from the dropdown list that will be used throughout the system. This formatted name will replace the [Name] tag if you use it within the system or in the text of the form invitation emails.
.jpg?inst-v=5c056e1e-ae23-46ea-99ee-f3d1279e23b0)
Change button
Now that the Contact Manager structure is defined, click the Create Contact Manager button;

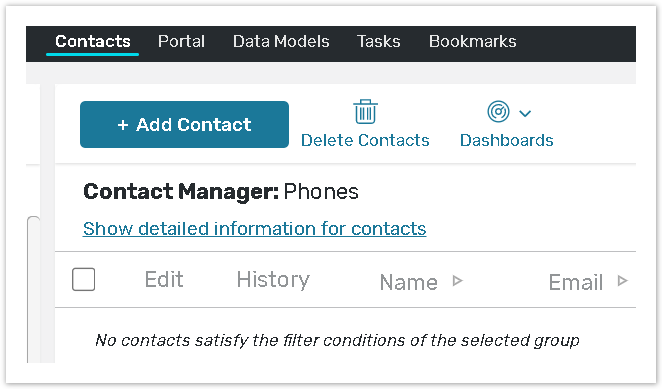
On the Contact Manager page click the Add Contact button to add new contacts:
Provide all the contact details. You can fill out the ID field manually, or check the Generate unique value automatically box for the ID to be generated automatically as a random number.
%20(1).png?inst-v=5c056e1e-ae23-46ea-99ee-f3d1279e23b0)
Click Save & New to save the new contact and add more contacts to the Contact Manager or click Save to finish and go back to the Contact Manager home page.
An Admin must create the Contact Manager first so their sub-users would be able to create their own Contact Manager.
Import File with Contacts
Create a data file using Excel or Notepad containing the data that you would like to upload. The data file may or may not contain the column headers and must have as many rows in it for as many contacts you would like to upload:

Save your file as a UTF-8 encoded .CSV file, with the data separated by commas, tabs, spaces, pipes, etc.
Open a Contact Manager page and select Import from CSV file option;
Select the data file you are going to import. This can be .CSV file saved locally on your computer or a .CSV file hosted on a remote (s)FTP or HTTP(s) server. If an import of the file from network or internet was selected, it is possible to select one of the protocols to be used(HTTP/HTTPS/FTP/SFTP/SslFtp(explicit or implicit)). If you indicated link on FTP/SFTP/SslFTP(explicit or implicit) location, link structure should be as follows: file_location/filename.csv and login and password must be specified for this location:
If the data file you are going to import contains column headers, select the Consider first line as header option;
Depending on the separator that is used within the data file, select the appropriate option from the Select the delimiter dropdown;
Click the Import CSV file button;
System will show you the first line of imported file as a preview.
.png?inst-v=5c056e1e-ae23-46ea-99ee-f3d1279e23b0)
Contact Manager Object fields are created automatically according to the imported file. Proceed with editing the default column names and set their formats.
Indicate the fields under the Select Special Fields column, that will be used as a ID, Email, Login, Password and Language. The ID will be used as a unique contact identifier. The Email will be used for email distribution purposes. Login and Password fields will be needed to provide access to the Participant Portal. The Language column stores a portal/mobile application language preference for certain respondent.
%20(1).png?inst-v=5c056e1e-ae23-46ea-99ee-f3d1279e23b0)
The Language field of Contact Manager also stores the ISO language tags, not the actual language name. If you use the Data flow functionality to pass the Contact Manager Language Field into a form or set up a filter for the Object Lookup question type, the language value will be displayed as the ISO language tags.
Now that the Contact Manager structure is defined, click the Create Contact Manager button.
Please read theContact Manager chapter for more information.