How to Create a Form with Form Builder
The article explains how to create a form.
Creating a New Form
Forms are easy to create in a few simple steps listed below:
%20(1).png?inst-v=5c056e1e-ae23-46ea-99ee-f3d1279e23b0)
Click the + New Form to bring out the Create a new form dialog.
The dialog displays 3 options:
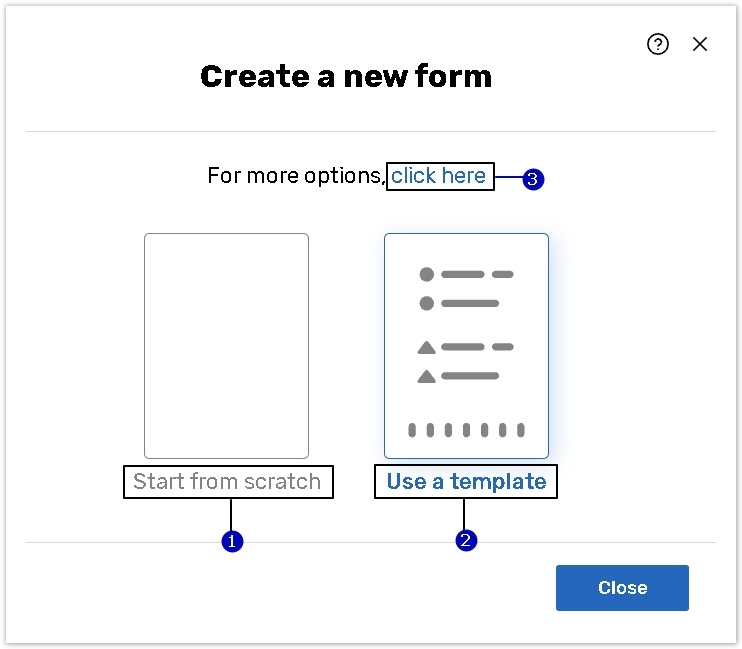
1. Start from scratch;
2. Use a template;
3. “Click here” for additional options.
Start From Scratch
Use this option if you want to create a form by manually adding questions and logic setups.
Once you have chosen the option, you can see a linear form in its basic state:
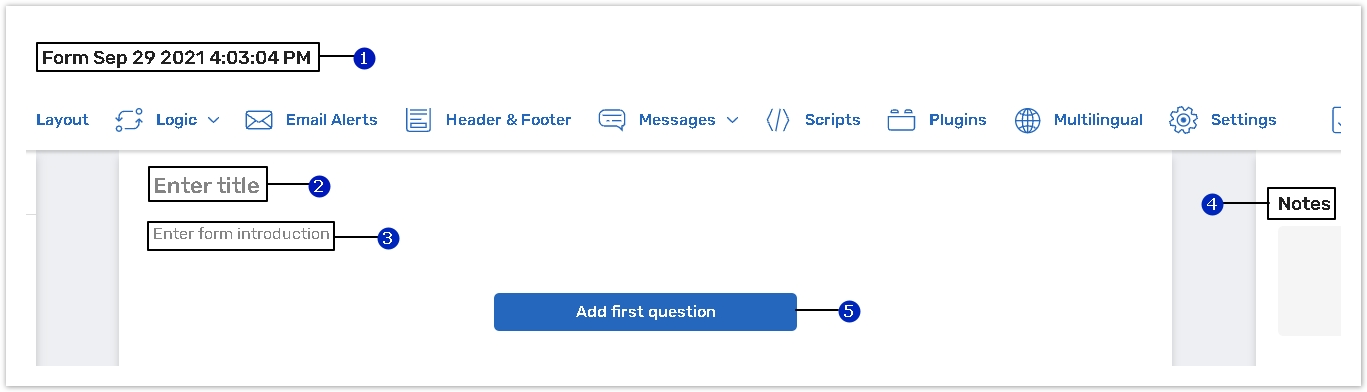
1. Change the form name (must be unique). The form has a predefined name – its date and time of creation.
2. Change the form title (optional);
3. Enter a form introduction (optional);
4. Add internal notes (optional);
5. Click the +Add first question button to create a question.
The Form builder has an intuitive interface and a robust set of tools. Read the Form builder interface and functions for more details.
Use a Template
This option gives you an access to the library of form templates split into different categories.
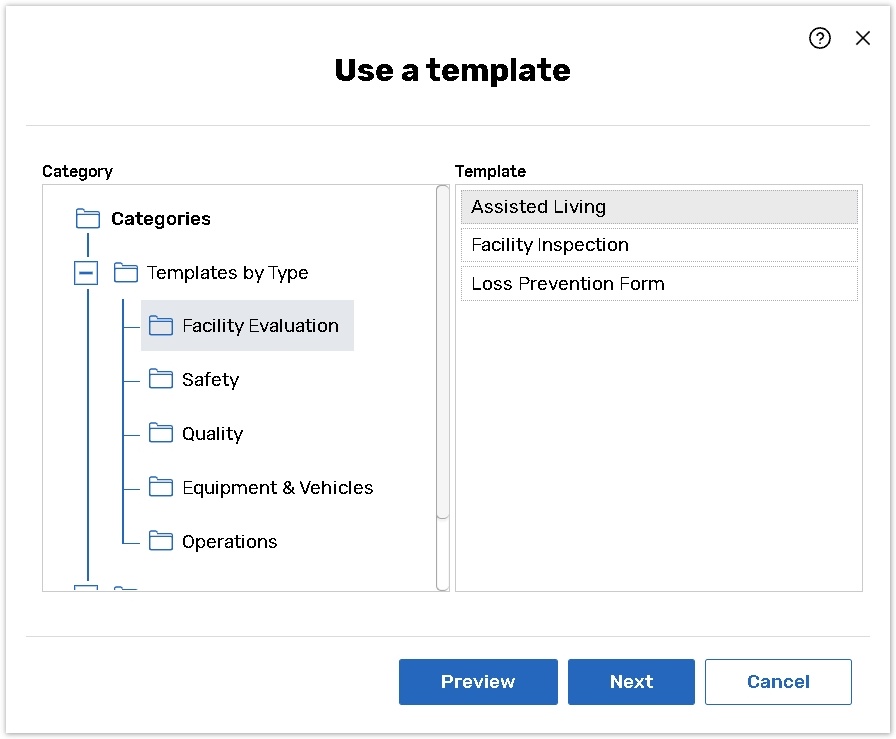
Select a category from the Category list box.
Select a template from the Template list box.
Click the Preview button to take a look at the survey template.
Once you have found one you like, you can continue by clicking the Next button
You can add a logo to the form to meet your company or product's design. Please read the Add Logo in Form Builder article to know how.
Additional options to create a classic survey
The following additional options allow you to use the following creation methods:
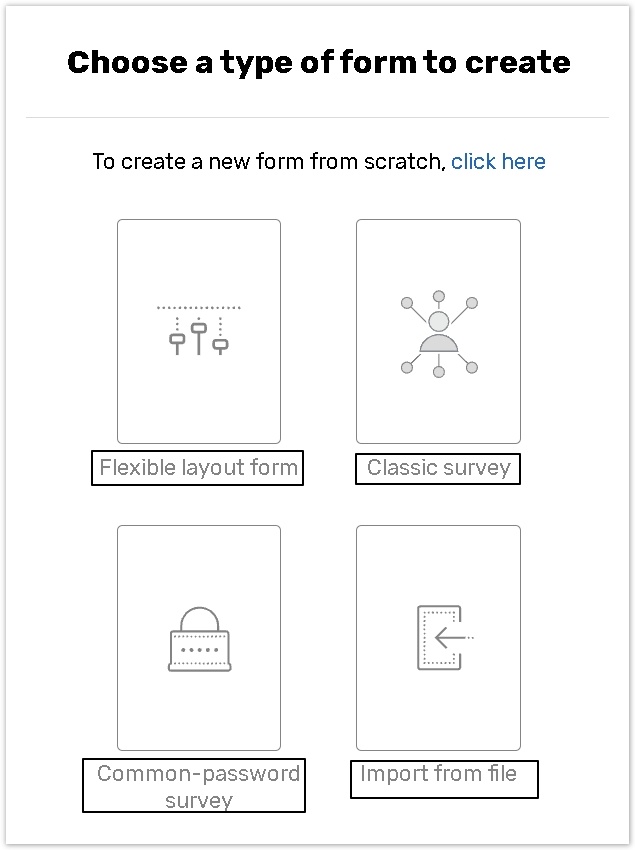
Flexible layout form: Creates questions with a fully configurable layout.
All elements are drag and drop to make your form look exactly as a paper based original.
Classic survey: a classic version of a Key Survey non-linear form.
Common-password survey: Use this option to conduct a Teacher-Student survey group as well as storing profile information and profile codes, as well as linking it to any other normal survey in your account. For more details consult the Common-Password Survey help chapter.
Import from file: You can import a form from an external data file using the custom text format.
Forms can be divided in 3 main categories:
Linear form (Start from scratch / Use a template creation methods) – has a linear layout that presents questions one after the other in the order they were created. This form is enhanced to work with the Form.com app by using page driven logic and access to a theme library that allows a design to be applied in one click;
Custom Form (Flexible layout form creation method) – creates questions with a fully configurable layout. All elements are drag and drop to make your form look exactly as it would on paper.
Classic Survey – is the same as a linear form but has question rather than page driven logic.
Importing form from a file
Use the Import from file option to create a form using the form builder with a set of platform tools.
Importing a form from a CSV file has different import scenarios:
Create a new form from scratch;
Create a new form based on the previously exported to CSV file:
- In the same user account;
- In a different user account.
After importing the form including ‘Matrix’ and ‘Check all that apply’ questions check their ‘Must answer’ validation rule as they can be broken.
Create a new form from scratch from the CSV file
When creating a form, you can devise a form structure along with the questions and answer options offline and import it via a CSV file. This is useful for quick importing of large forms that contain multiple questions and significantly reduces the time spent on form creation.
Once you have selected the Import from file option, the system displays the Import from file dialog.
Choose a file on your device and press Upload.
%20(2).png?inst-v=5c056e1e-ae23-46ea-99ee-f3d1279e23b0)
Preparing CSV file
The data in a CSV file must be structured in a certain format to recreate the required form structure. Each row after the header row corresponds to a form element (a question), and columns correspond to values that define each form element.
Click here to download the sample CSV file.
Some of the columns or particular column values are mandatory, and form cannot be created without them; the rest of the columns are optional and may be skipped.
The columns in the header row can be listed in no particular order, but in some cases validation rules may apply.
See the CSV file structure for more details.
For other Import scenarios, please read the Import from file article.
Copy an existing form
You can copy (create a duplicate) an existing form with the reports and responses included.
Go to the list of your forms or use search to select the form you wish to duplicate.

Click Copy to bring up the dialog menu:

If you wish to include reports and/or responses, tick the corresponding box next to the option (1).
Choose a destination folder (2) where the copy should be placed and press OK.
The copy with reports/results feature can be enabled upon a request.
Forms names should be unique.