Data Model Object Synchronization
Object Synchronization feature allows importing lists of objects from external sources instead of creating objects manually one by one. Using Object Synchronization, you can also update lists of objects automatically.
Data Objects can be synchronized by importing a CSV file. It can be stored on the local computer or remotely on the FTP, HTTP, etc. servers.
CSV data file should be UTF-8 encoded with up to two bytes per character. In most cases, importing a UTF-8 encoded CSV file with 3- and 4-byte characters is possible. However, we can not guarantee that your 3 and 4-byte symbols will be displayed correctly.
The maximum size of the file is 2 GB.
A line break (also known as a newline character) added within a field in a CSV file will cause the import failure.
Here are the recommendations for the maximum size of the Data Model:
Not more than 400 columns.
Not more than 4000 Bytes per row. For instance, 4000 symbols in English, 2000 symbols in Cyrillic alphabet.
No restrictions for the number of rows.
If the number of columns or bytes are exceeded, it may result in Data Model performance issues.
How to set up the feature
To set up new synchronization:
Go to the Data Models tab.
Choose the Data Model you would like to update. Click the Import button:
%20(1).png?inst-v=955f8bd8-7a38-40d6-9236-ce0b960f934b)
You will be redirected to the Synchronization page. Click the Setup New Import button:
%20(1).png?inst-v=955f8bd8-7a38-40d6-9236-ce0b960f934b)
On the Import settings page, select the file to import. The platform provides 2 options - it is possible to upload the file either from your computer or from the network or the internet.
Import file from your computer
%20(2).png?inst-v=955f8bd8-7a38-40d6-9236-ce0b960f934b)
Select the file to import allows you to choose the file;
Check the Consider First Line as Header box if the data file contains column headers;
Select the delimiter from the dropdown menu. The Comma delimiter is selected by default;
If you perform synchronization not for the first time, you will also need to choose whether your records should be updated with the source data if any differences are detected.
If you want a notification email in case of an import failure, you can specify an email address.
Confirm the accuracy of the file on the Import file preview page. Press the Next button to proceed with the Import process.
.png?inst-v=955f8bd8-7a38-40d6-9236-ce0b960f934b)
To fully understand the import settingsfunctionality, please read the Import Settings
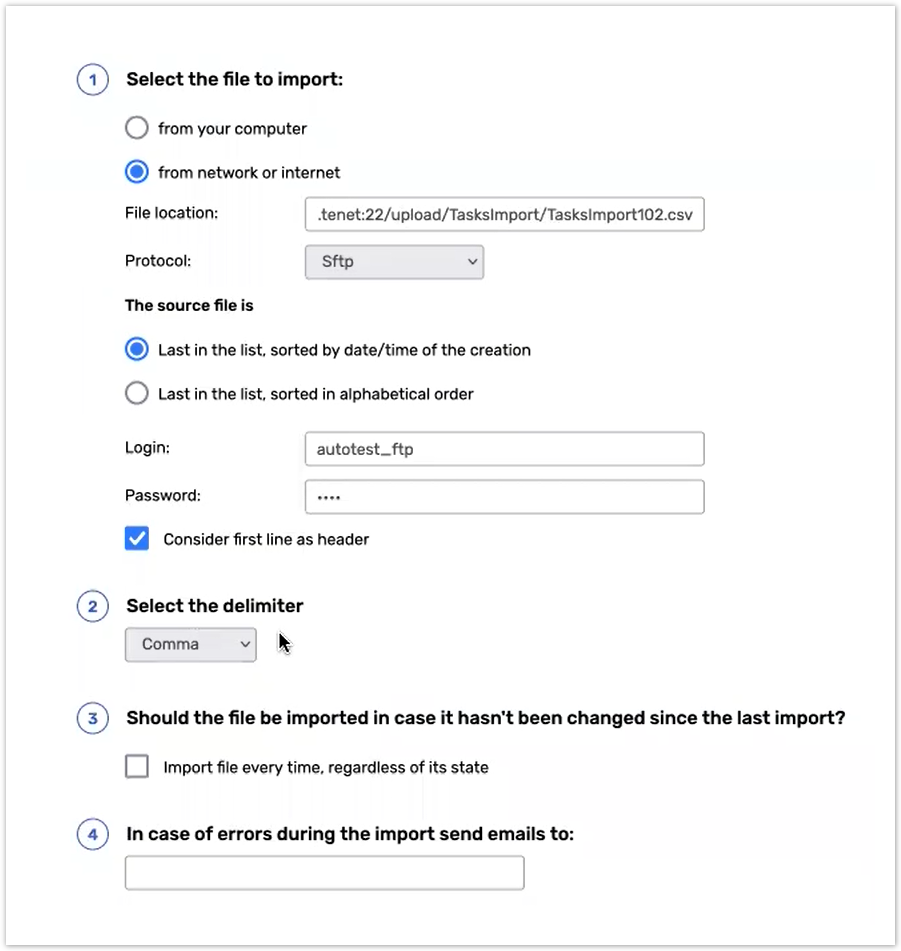
Import objects from the remote data source
If you indicated link on FTP/SFTP/SslFTP (explicit or implicit) location, link structure should be as follows:
ftp://file_locationIf you want to indicate a folder with the list of files, the structure link should be as follows:
ftp://folder_location/*.csv
Select the From network or Internet option;
You have to indicate the path to it. Specify the file location in the File location box;
Indicate the type of the Protocol;
Once you indicate the path to the folder, you can check one of the 2 options The source file is set;
The source file is an option. In case you indicate the path to the folder, you can select one of the two options below:
Last in the list, sorted by date/time of the creation;
Last in the list, sorted in alphabetical order.
Enter the Login and Password to connect to a remote server;
Check the Consider First Line as Header box if data file contains column headers;
Select the delimiter from the dropdown menu. The Comma delimiter is selected by default.
Confirm the accuracy of the file in the Import file preview page. Press the Next button.
%20(3).png?inst-v=955f8bd8-7a38-40d6-9236-ce0b960f934b)
To fully understand the import settingsfunctionality, please read the Import Settings
If you use both the Delete the records not found in the synchronization file and the scheduled synchronization with the external source options, and the data file changed more than 10% of records that appear in the Data model, such an import will not be performed in order to avoid accidental deletion of records.
If you still need to perform such an import please either deactivate the Delete the records not found in the synchronization file option or delete records from the Data model manually before the synchronization.
Mapping Fields
If you are importing objects to an existing data model, on the Mapping page, you can map .CSV file fields to the fields already present in the Data Model. If the data file contains more fields than appear in the Data Model, you can add new Data Model fields right from this page.
To map the fields:
%20(1).png?inst-v=955f8bd8-7a38-40d6-9236-ce0b960f934b)
Click the data source column from the Import File columns field.
Click the column you want to synchronize with from the Data Model Fields field.
Click Apply Mapping.
When you need to delete a mapping click Remove.
Select the column to use as a unique identifier so there are no duplicates within the Data Model.

Click Run Import now or Schedule import button to import objects.
Click the Run Import now button to import data models right away.
Click the Schedule import button to schedule for data synchronization.
Read the Schedule Import article to know how to set up the feature.
