RESTful API Plugin
The RESTful API plugin is used to execute calls to RESTful web services upon forms' submission.
The data collected in the form is passed inside an API call to an integrated outer resource.
The OAuth 2.0 mechanism is used for the authentication which means the client's keys (the ID and the secret) for the FORM application should be generated by the external web service.
Parameters
To use the plugin in your form, specify the following parameters (required parameters are marked with an asterisk):
Logical condition: Specify the logical expression that will trigger the sending of the API call. Use Qx.Ay notation and OR/AND logical operators to create complex logical expressions; for example: Q2.A1 AND (Q5.A2 OR Q5.A3).
Authentication URL*: The OAuth 2.0 authentication endpoint URL, for example: https://login.salesforce.com/services/oauth2/token
Client ID*: The Client ID generated by the OAuth 2.0 service and assigned to the Key Survey/Form.com application.
Client Secret*: The Client secret generated by the OAuth 2.0 service and assigned to the Key Survey/Form.com application.
Login*: The login name of the end user that will be used for the authentication. As for the URL example in the pt. 2, the login credentials for the Salesforce platform should be specified.
Password*: The Password of the end user that will be used for the authentication.
Test Authentication: After you have set logical conditions and all the mandatory parameters, use the Run Test button below to send a RESTful request.
As an outcome, you will receive either the Authentication Successful or the Authentication Failed message together with the corresponding status code.
Web Service URL*: The RESTful web service URL. This field supports piping references, so you may use them to import values from the form answers into the link.
HTTP Request Method*: The HTTP Request method that should be used for the RESTful call. You may choose one of the following: POST, PUT, PATCH, GET, DELETE.
Parameters: Provide the list of parameters that will be sent in the body of the request.
Use the following format to create the list: name=value, for instance: subject=New task.
You can use piping references (e.g. {Q1.A1}) within the value part of the parameter.
Use tags to send the links to the files added via the File Upload question: LINK:{Qx.Ay} for downloadable links, PLINK:{Qx.Ay} for links preview (previews the image or shows an icon for non-image file types).
You may also use question and answer identifiers instead of the Qx.Ay question references, for example: LINK:{aid}.
When an image is accessed by a direct link, a browser will show a download dialog.
To show an image right away, place a link to an image inside the <img src='downloadable link'/> HTML tag.
Using plugin to send the report links
The plugin can send the Report by Respondent (rbr) links to an external application along with other data.
The parameter for this and its value may be specified in the following way: Parameter name=Parameter value; for example: rbr_link=[R]
Note that the rbr_link parameter name is just an example and you can come up with your own.
The following tags may be used as the parameter value: [R], [RnoNav], [RnoHidden], [RPDF].
The difference between these tags is described in the Email Alert Tags Help chapter.
There is no limit to the number of parameters you can send; however, the character limit for all fields of the plugin is 16,000,000 symbols.
Error processing
if multiple instances of the plugin were set up in a form, the requests generated by the plugins will be sent via separate queues. These queues are unique per User Identifier and remote URL.
Depending on the received errors codes, messages sending will be retried according to the following rules:
Code 500. Module retries to send a request after 1,5,25 min, then every 30 min for 3 hours, and then sends it to the error queue.
Codes 408, 502, 503, 504. Module retries to send a request after 1, 5, 25 min, then every 30 min for 24 hours, and then sends it to the error queue.
Module retries to send exceptions without code (timeouts, etc.) after 1, 5, 25 min, then every 30 min for 24 hours.
Other (404, 401) codes are logged as errors and module does not try to send a request again.
For more information, please refer to the following table:
HTTP Code(s) | 1st Interval | 2nd Interval | 3rd Interval | 4th Interval | 4th Interval Duration |
500 (Internal Server Error) | 1 minute | 5 minutes | 25 minutes | 30 minutes | 3 hours |
408 (Request Timeout) | 1 minute | 5 minutes | 25 minutes | 30 minutes | 24 hours |
502 (Bad Gateway) | 1 minute | 5 minutes | 25 minutes | 30 minutes | 24 hours |
503 (Service Unavailable) | 1 minute | 5 minutes | 25 minutes | 30 minutes | 24 hours |
504 (Gateway Timeout) | 1 minute | 5 minutes | 25 minutes | 30 minutes | 24 hours |
404 (Not Found) | Does not Resend | ||||
401 (Unauthorized) | Does not Resend | ||||
409 (Conflict) | Does not Resend | ||||
400 (Bad Request) | Does not Resend | ||||
All Other Valid HTTP Codes | Does not Resend | ||||
Exceptions without code (timeouts etc) | 1 minute | 5 minutes | 25 minutes | 30 minutes | 24 hours |
The initial request should happen near real time and if a failure occurs, the retry attempts will wait according to the above.
Each request that retries will block all other requests for the same end point and the same user that the form belongs to.
If there is the same endpoint but different forms that were created by different users – requests will be blocked in separate queues.
Setup example
Let's explore in more detail how to apply this plugin on the example of the Salesforce and http://Form.com integration:
Step 1: Setup necessary parameters within the external application:
Login to the Salesforce. Please note that you should have a developer's account in order to use this functionality.
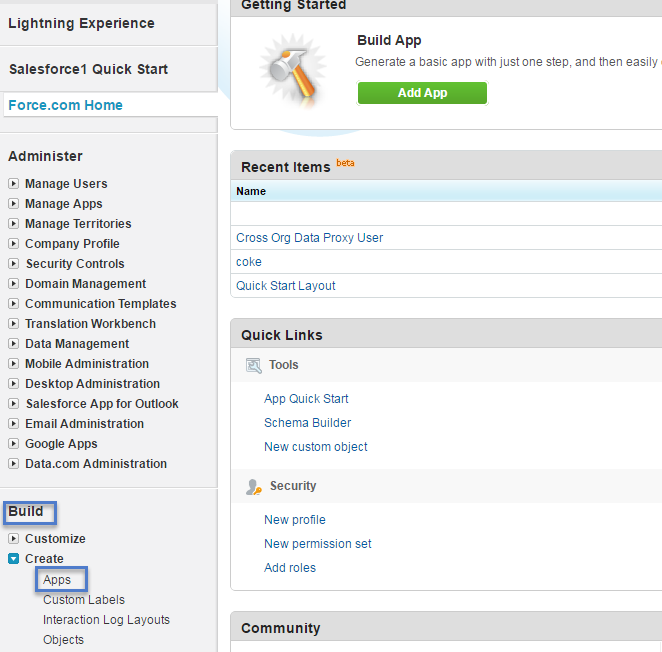
2. In a left pane, navigate to the Build section and click on a black arrow on the left of Create link. Select the Apps option from a list:
3. Go to the Connected Apps section and click the New button:

Provide Connected App name, API name, and Contact email.
Check Enable OAuth Settings option.
Provide Callback URL, and select Full access(full) option from the Selected OAuth Scopes list and click the Save button.
4. Click the Setup button on the top:

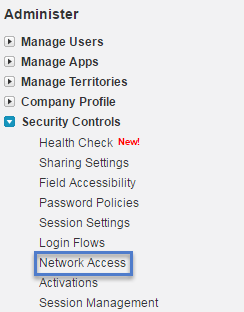
5. In a left pane, go to the Administer section and select Network access option from the Security Controls list:
6. Click the New button on the right from the Trusted IP Ranges line and specify the Start and End IP addresses of a range that includes your server's IPs. Click the Save button.
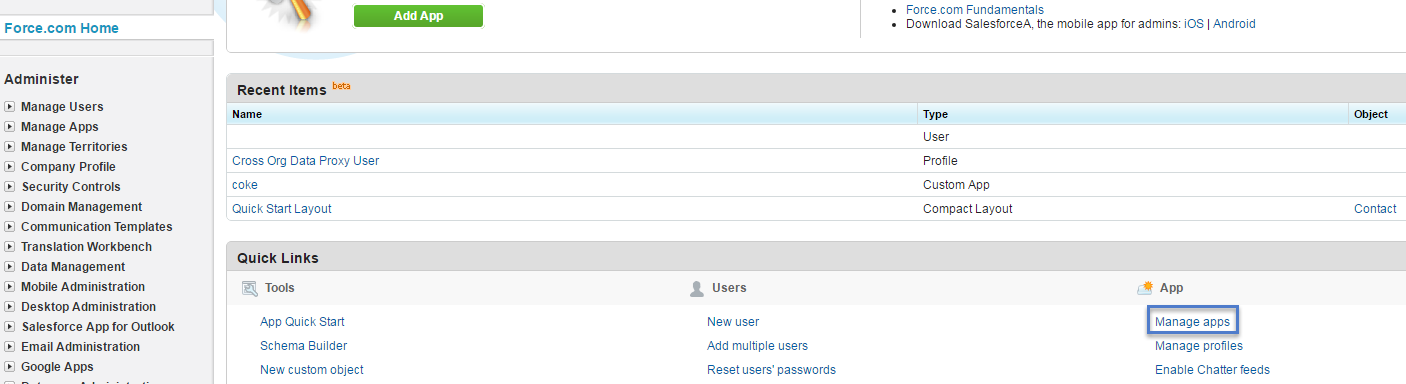
7. From the http://Force.com Home page go to the Manage Apps:
8. Find created app under the Connected Apps tab and click on the Manage link.
9. Then click the Edit button and specify necessary OAuth policies:

10. When everything is set up, go to the page with your application details(for that, go to Apps page and navigate to Connected apps section) and copy Consumer Key and Consumer Secret (they will be further used as plugin parameters).
Step 2: Apply the RESTful API plugin to your form using the Form.com/Key Survey application:
Create your form.
Apply the RESTful API plugin from the Workflow section using the following parameters:
Logical condition - Specify the logical expression based on a form/survey questions that should be met to send the API call. Use Qx.Ay notation and OR/AND logical operators to create complex logical expressions.For example, Q2.A1 AND (Q5.A2 OR Q5.A3).
Authentication URL - https://login.salesforce.com/services/oauth2/token
Client ID - Type in Consumer Key provided by Salesforce.
Client secret - Type in Consumer Secret.
Login - Login that is used for the Salesforce authentication.
Password - Password that is used for the Salesforce authentication
URL - To create a new task within the Salesforce, use this URL: https://eu6.salesforce.com/services/data/v26.0/sobjects/Task/
HTTP Request Method - Select POST method.
Parameters - Subject=Test_task; priority=high.
Once the form is submitted, the following task will be created in a SalesForce account:

Red exclamation mark next to the Subject means that this task has a high priority.
The RESTful API plugin can only send data to URLs on HTTP ports 80 and 443, FTP port 21.