Settings
On the Settings page, you can specify the required Form functionality. This page consists of 2 tabs: Form Settings and File Upload Settings.
For more information about the File Upload Settings please consult the corresponding article.
How to get to the Settings page
Click the Settings button on the upper toolbar.
%20(1).png?inst-v=955f8bd8-7a38-40d6-9236-ce0b960f934b)
The Settings page will be opened.
%20(2).png?inst-v=955f8bd8-7a38-40d6-9236-ce0b960f934b)
Form Settings
The following settings may be applied to the form:
%20(3).png?inst-v=955f8bd8-7a38-40d6-9236-ce0b960f934b)
Do not allow respondent back into form. Once a respondent submits a response, this respondent is not allowed to come back and change his responses. A returning respondent will receive a message thanking him for his participation in the form.
Respondent may return and modify their response. The respondent is allowed to come back to his response and make changes. The old responses will be overwritten with the new ones.
Allow multiple responses - only applies to Master URL or Participant Portal.
For multiple responses from the same computer, you must use the specified on the Form Settings window link.
Keep in mind that you must keep the tab with your responses open: in case it is closed, you will not be able to return to the responses.
When submitting multiple responses from the same computer using the Master URL, your respondents must close the browser window or tab each time they have submitted a response.
When the form is filled out via the Master URL, browser cookies are used to identify respondents.
%20(2).png?inst-v=955f8bd8-7a38-40d6-9236-ce0b960f934b)
If your form has more than one page, you may activate the progress indicator for completed pages, which will appear at the bottom-right of the online survey. Use these radio buttons to define how progress is reported to respondents as they complete the survey:
Do not show progress indicator Respondents will not see any indication of their progress through the survey.
Show page numbers Respondents will see their progress as Page x of y.
Show progress in bar graph Respondents will see a bar indicating how far along they are in the survey.
Show progress as percentage Respondents will see the percentage completed at the end of each page
You can also apply Circular progress bar indicator (advanced feature). For more details consult the Pluginshelp chapter.
%20(2).png?inst-v=955f8bd8-7a38-40d6-9236-ce0b960f934b)
Access to responses
To grant access to completed responses, you can select between 2 options:
Restrict only to authorized users Only the account owner or their sub users will be able to access Report by Respondent (RBR) links when logged into their account. If a response is submitted by a Portal User, other contacts who have access to the same Portal will be able to view this response when logged into the Online Portal. If a response is submitted by other means (by Master link, Unique link, etc.), the respondent will be able to access their last RBR for one month after the submit date.
Allow access to everybody via direct RBR link Everyone who has a direct link to the response (RBR) will be able to access and view it.
By default, access to completed responses is restricted to the authorized users. For the forms created prior to 8.27 release, access to the responses will follow the old behavior, so Allow access to everybody via direct RBR link will be selected.

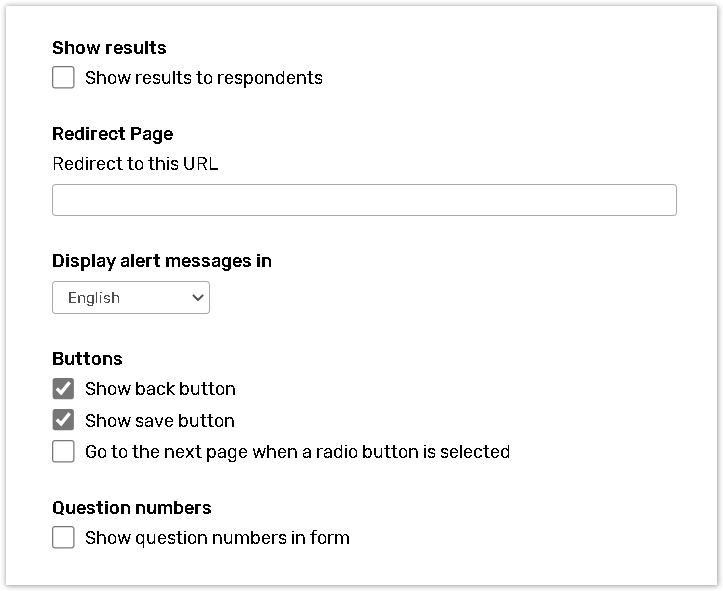
Show Results
Select the Show results to respondents option to redirect a respondent to the Standard Report upon Submit. The Standard Report will include all Completed responses so far.
Redirect Page
You can enter a URL in the Redirect Page text box to redirect a respondent to the specified web page upon Submit.
You will not be able to set up a Redirect page if you check Show results option.
Display Alert Messages In
You can use this drop-down box to select the language in which the system pop-up alerts will be displayed.
Buttons
Show back button The Back button allows a respondent to go back to previous pages. This button will appear only if the form has multiple pages. By default, Back button is enabled.
Show save button The Save button can save partial results and allows the respondent to complete his response by accessing the same link later.
Go to the next page when a radio button is selected This option should only be used if there is only one question on the page. When this option is selected, respondents will go automatically to the next page by selecting a radio button.
The last option is only applicable if Pick one or 'Other' question type is used, and the 'Other' option is not activated.
Question Numbers
This feature activates/deactivates the question numbers which appear before the question text.

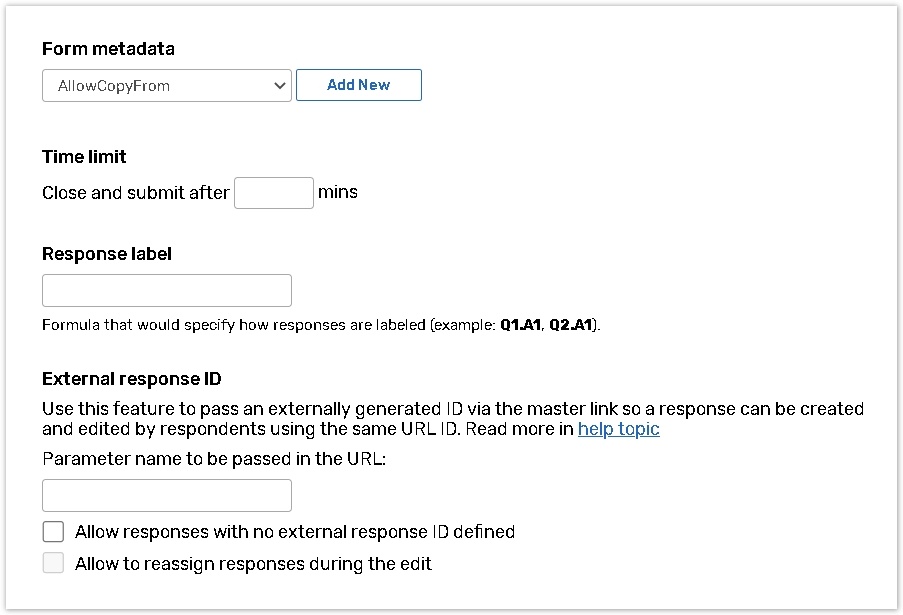
Form metadata
On the My Account -> Survey Metadata Setup page you can enable your metadata. After metadata fields are set up for your account, you can add the metadata here.
Time Limit
You can specify the time limit for respondents. When it runs out, the response will be closed and submitted.
The form will be submitted anyway, Must answer settings are ignored.
Response Label
You may assign a custom Response Label to each response by using data from response. Type any text and reference a Single line text response field in the Qx.Ay format from which you would like to pull data. This feature is very useful on the User Portal as it allows to differentiate responses easily and present some specific data from this response in its header.
For example, if the Name of the respondent is stored in the first field of Q1, you may type: Response of Q1.A1.
External response ID
This feature (also called the URL ID) is used to grant personalized access to a response through form URLs sent to users. Similarly, to the URL Suffix functionality, the form creator specifies some parameter name that will be added with some unique identifier into a custom URL.
RDS plugins settings
To get access to this functionality, ask your Account manager to enable ‘Allow creating an item in another account’ right.

This feature is used to provide the permission for other accounts to send data to this form based on the following plugins configuration:
Task Workflow
Copy Responses
Logical Workflow
Workflow.
Here you need to add the ID of the form where the plugin is set up and from where the data will be sent.
For more information about the File Upload Settings please consult the corresponding article.
