Manual Application Tags
The application tags are used in a manner similar to the HTML tag. You can use them to add visual and/or functional enhancements to the form.
There are custom application tags that can be set using the form builder interface. This article covers functionality application tags that require the manual implementation to your form.
<REVIEW></REVIEW>
This tag gives respondents a possibility to review the answers before finally submitting the form.
The <REVIEW> tag may be useful when filling out long, multi-paged forms; respondents may want to re-check already given answers just to be sure.
The tag can be inserted anywhere in the form, but we suggest adding it at the very end, for example, you can use it in a last question or in a form's footer.
To add the <REVIEW> tag:
Add a question at the end of your form or add a footer using the Survey Header and Footer button.
Be sure to enable the WYSIWYG editor. To check it, use the Toggle WYSIWYG Editor tab button to switch the edit modes.
Add the explanation text, either custom or the same as the following: "Please click this link to review your answers.".
Select the text that will be hyperlinked; for example: "Please click this link to review your answers.".
Click the Review Link button to turn the selected part of the text into hyperlink.
Click Save.
<UPLOAD_YOUR_FILE/> (deprecated)
This tag still works but it is out of support in case of any issues occur.
Please use File Upload question instead of this tag.
This tag is used to allow respondents to upload the file from their side while filling the form. This can be a document, image or any other file which size is under 4Mb.
To allow respondents upload the file follow these simple steps:
Insert new question. You can use any available question type.
Type your question text asking respondents to upload the file. For example: "Please upload your resume here."
Insert the <UPLOAD_YOUR_FILE/> tag in the question's text field. You must turn WYSIWYG editor off before inserting the tag.
Save your question.
Here is an example of the tag in action:

To download the uploaded file run the report and switch to the View By Respondent mode. You will find the link, click on it and download the respondent's file. The original file name will be preserved.
| | |
This tag is used to place answer labels for the Rating Scale question type on the left and right side of the radio buttons used for answer selection. It gives you the option to control the layout of the question by giving you the flexibility to control the display of your answer labels.
This tag is used to place answer labels for the Rating Scale question type on the left and right side of the radio buttons used for answer selection. It gives you the option to control the layout of the question by giving you the flexibility to control the display of your answer labels.
Insert new or edit existing Rate Scale question to apply the tag.
Type in answer choices in the following manner: good|||bad.
Please note answers input mode must be switched to Standard.
Click the Save button.
Here is the example how this tag should be inserted in the edit mode:

and how it looks for participants:

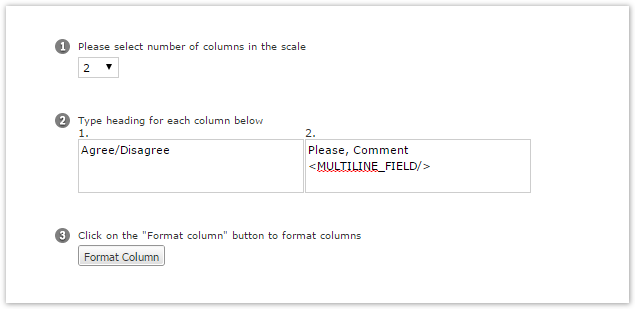
<MULTILINE_FIELD/>
<MULTILINE_FIELD/> tag allows to expand text field and make it multiline. To apply this tag, add it to the Matrix scale header:

With this tag applied the question will have the following appearance:
.png?inst-v=955f8bd8-7a38-40d6-9236-ce0b960f934b)
