Forms Page
Once logged in, you will be directed to the Forms page which is the home page for the Form.com data collection platform.
The page is divided into 4 panes. The article provides a description of each pane.
Main Navigation Menu
The Main Navigation Menu is located at the very top of your account and allows you to navigate to the following account sections.
Click on each section from the table below to read more information about it.

Section | Description |
Forms | It is a home page of your account. It allows you to track the response rate and manage your Forms |
Form.com platform allows real time access to your forms’ reports. There is a default ready-made standard report for each form. The Reports page is a page where you can access all form reports. | |
Dashboards allow you to visualize, manipulate and share the data you collect through our platform. | |
The Contact Manager is an advanced storage for your contacts allowing you to create multiple contact records and distribution lists, and then use these lists for different distribution campaigns. | |
Portal provides access to Forms or Tasks for Portal or Mobile App users by logging in to the Portal from a web browser or a mobile application. | |
Custom data models work as advanced databases of any information to be used on the platform. | |
The platform allows to create and assign tasks to the respondents. A task can be used for many different use cases: | |
The Admin account is used to create and administer the rights of all users and accounts in the application. | |
Here you can view and analyze collected data in real time with the platform’s integrated QlikView reporting functionality. | |
It is possible to view and modify all of the necessary information and your account status from the My Account page. | |
Logout | Click this button to Logout of your account. |
Live Support | Click this button to begin a chat with one of our Support representatives. |
Help | Click this button at any required time to access the corresponding topic of the functionality in our Help Center. |
Folders Pane
The Folders Pane is a tree that is located in the left pane. You can create custom folders for different forms to keep them structured and ordered in the way you need.
Form are sorted automatically in ascending order according to the date of creation (newly created forms will be on the very top of the tree). Folder name is hyperlinked and shows the list of Form in the center pane if clicked.
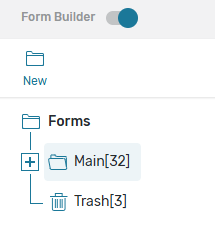
The Form Builder toggle is turned on by default.
The New button allows you to create a new folder in the selected folder.
By default, the Forms folder contains 2 folders: Main and Trash. Click the + button to view subfolders.
Nested folders
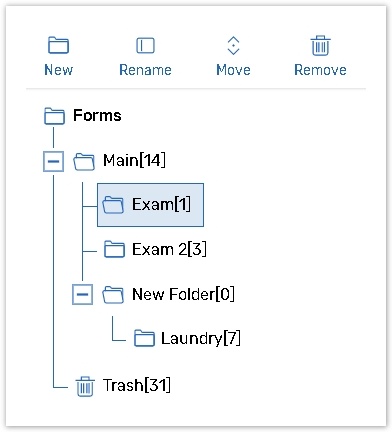
The Rename button allows you to rename a selected folder.
The Move option allows you to move a folder with its reports to a selected one.
Click the Remove button allows you to delete a selected folder.
Trash folder
The Trash folder is a temporary storage for deleted forms. Click the Trash button to view the following options on the central pane:
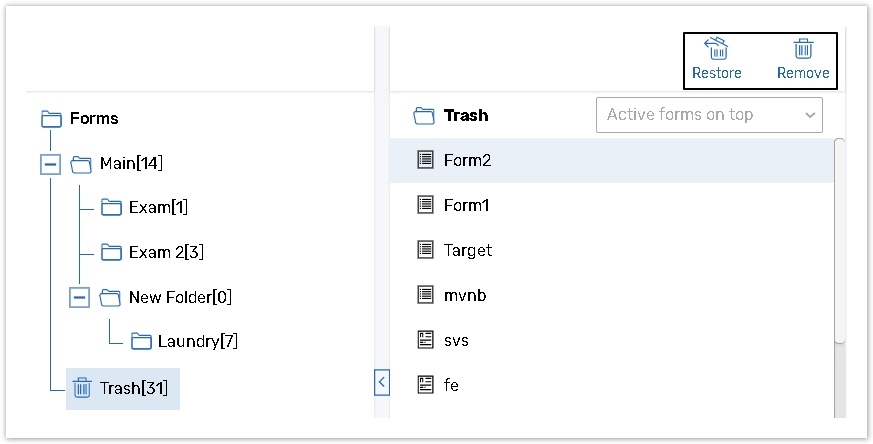
Restore allows you to restore a selected form.
Delete permanently deletes selected form from your account.
You cannot rename, move or delete default folders (Main and Trash).
You cannot move custom folders if they include nested folders.
Forms List
The Form List is a list of forms located in the center pane. The Forms list is a list of previously created Forms. The Form list can be sorted by the name, date of creation, end date or status.
It includes the following options:
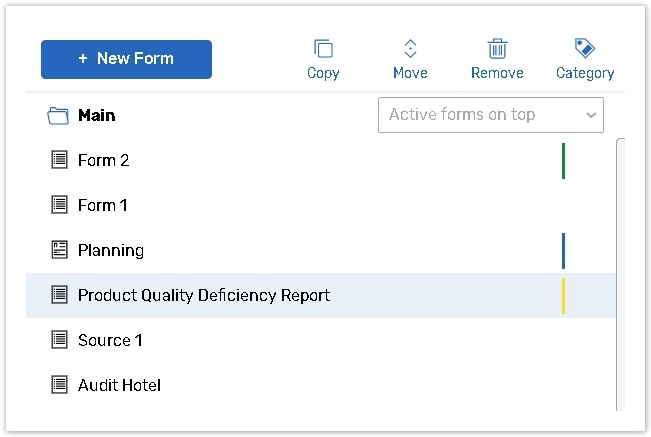
New opens a dialog box that allows you to create new Form using different options. For more details consult the How to Create a Form with Form Builder help page.
Copy opens the Copy Form dialog and copies selected form with reports and/or results if selected. Please read the How to Create a Form with Form Builder article for more details.
Move opens a pop-up that provides a possibility of choosing where you would like to move the selected form.
Remove moves the Form to the Trash folder.
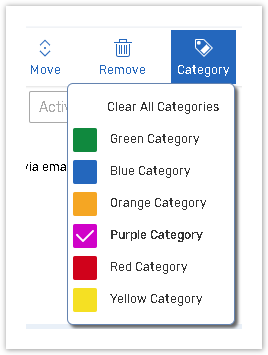
Category allows you to categorize your forms by associating them with a color.
The Active forms on top dropdown box allows sorting forms in the following ways: Active On Top, Date Created Descending, Date Created Ascending, Descending by Name, Ascending by Name, End Date Descending, End Date Ascending.
Inactive Forms are marked with the grey, almost transparent names. This means that they are closed - either the end date or the limit of responses have been reached.
Click on the survey to select it. Hold the Ctr and Shift (for PC) or Command (for MAC) keyboard buttons to perform a multiple selection.
Category button
Click the Category icon and select the color you want to apply to the selected forms. Click the Clear All Categories option to remove all categories from the selected forms.
Form Information Pane
Form Information pane shows information per selected form. The pane also display certain functions and features you applied to the selected form.
By default, the panel displays the following information:

Edit - click this button to edit the selected form.
Launch - redirects you to the form Launch page.
Report - click this button to view the report for the selected form.
Print - prints the selected form to the PDF.
Form name - you can edit it here inline. For editing, please mouse over and click on the pencil icon. When ready tick the check mark icon.
Form ID - a unique id of a form or a form in the system.
Theme - this detail shows the name of the form layout theme if any. For more details consult the Form Layout help chapter.
Offline - parameter indicates if the form is available for FORM Applications.
Completed shows you the number of completed responses, i.e. the amount of those users who clicked the Submit button.
In Progress shows you the number of respondents who opened your Form and clicked Next or Save button.
Not Started - this line show the number of respondents who were invited to participate in the form via the E-mail Survey Distribution or respondents of the Restricted by Unique Codes form.
Response Rate is a value of the total number of the completed surveys multiplied by 100 and divided by total number of completed and incomplete forms.
Notes - write your the notes if any. Notes are visible only on the administrative level and not to the form participants. Add them on this panel inline or navigate to the survey Edit page.
Display Title - shows you the form title if any. Add it here inline or navigate to the form Edit page.
Search Option
Use this option to find a form you need. Type the form name, title, introduction or form ID and click the GO button to start searching.

To search for the text within a single form
Select a form from the forms home page.
Click the Edit button from the Form Information Pane in the right part of the screen.
Input search text in the Search text field.
Click the Go button.
Text that matches your search criteria will be highlighted.
Advanced Search looks for an input text within the single form
Select a form from the forms home page.
Click the Edit button from the Form Information Pane in the right part of the screen.
Click the down arrow next to the Go button and select the Advanced Search option.
Input text to find.
Click the Find Next button to start searching.
Text that matches your search criteria will be highlighted.
Find and Replace tool looks for an input text within the single form and replaces it with the different text
Select a form from the forms home page.
Click the Edit button from the Form Information Pane in the right part of the screen.
Click the down arrow next to the Go button and select the Replace option.
Input text to find and text to replace.
Click the Replace button to replace first found match or Replace All to replace all matches in the form.
The Go to tool allows you to navigate to the question you need just in a second
Select a form from the forms home page.
Click the Edit button from the Form Information Pane in the right part of the screen.
Click the down arrow next to the Go button and select the Go to option.
Input text to find and click the Go to button.